
That Black Sunken Patch On Your Tomatoes Shows Up After A Hot Spell, But The Real Cause Starts At The Hose
Follow us on Google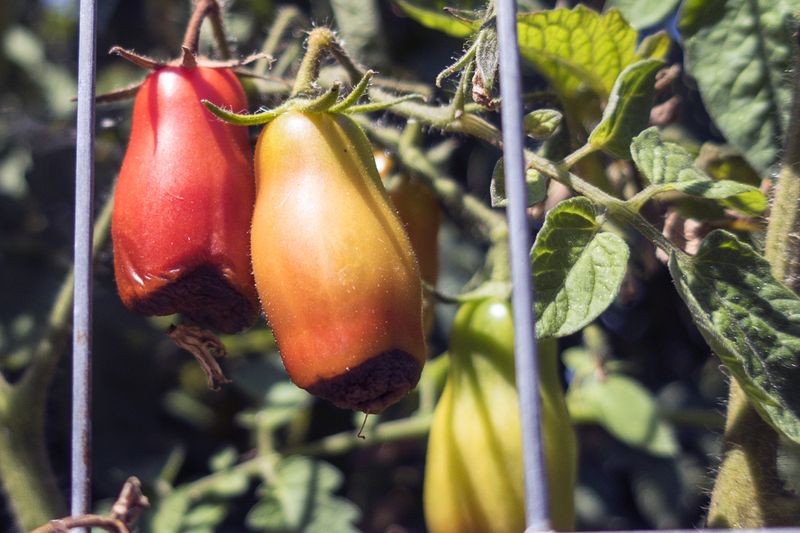
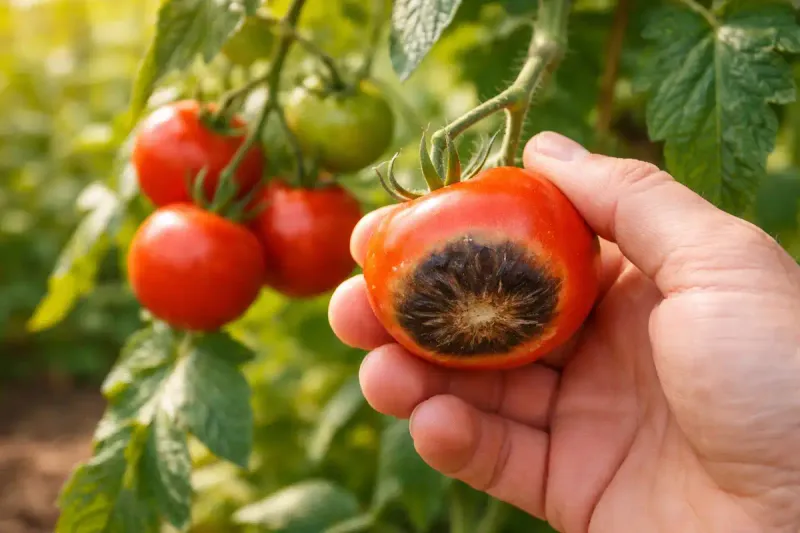
You pull back a leaf expecting a perfect tomato and find a dark, sunken patch covering the bottom of the fruit.
It looks alarming, and the first instinct is to reach for a spray bottle or a bag of garden lime.
But this particular problem is not a disease spreading through your plants, and a spray will not fix it.
Understanding what is actually happening inside that fruit can save you money, protect your harvest, and keep your garden from going through the same mess next summer.
That Black Patch May Be Blossom-End Rot
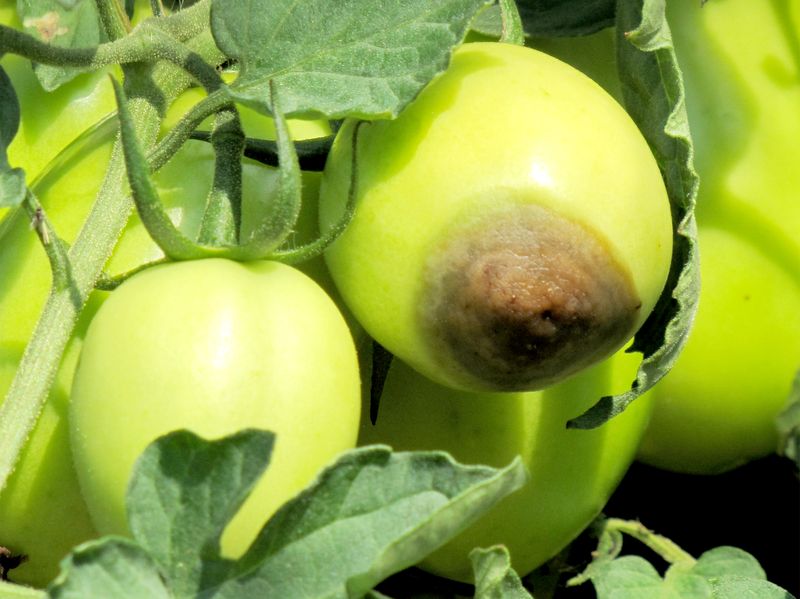
Flip the tomato over and look at the end farthest from the stem.
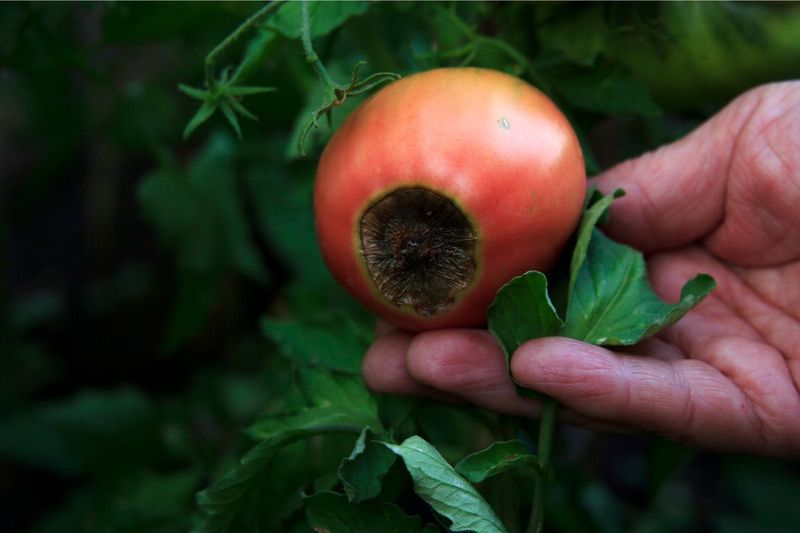
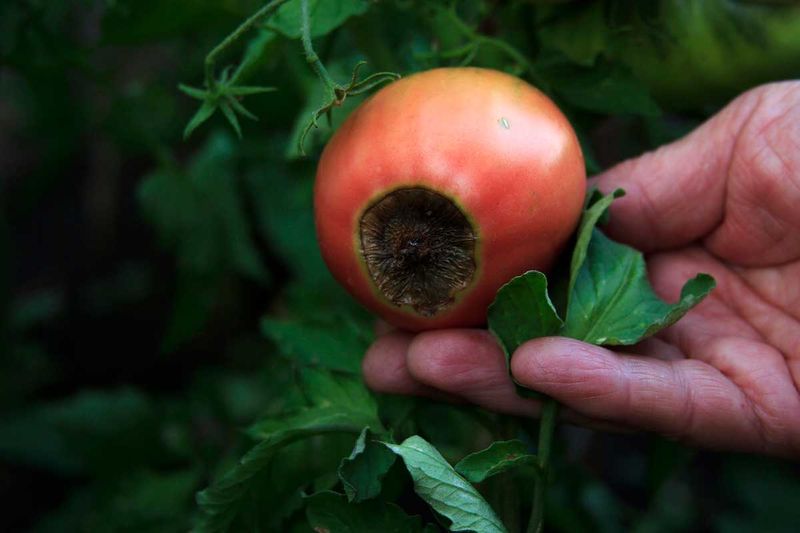
That is the blossom end, the spot where the flower once attached, and if the damage is there rather than on the sides or near the stem, you are most likely looking at blossom-end rot.
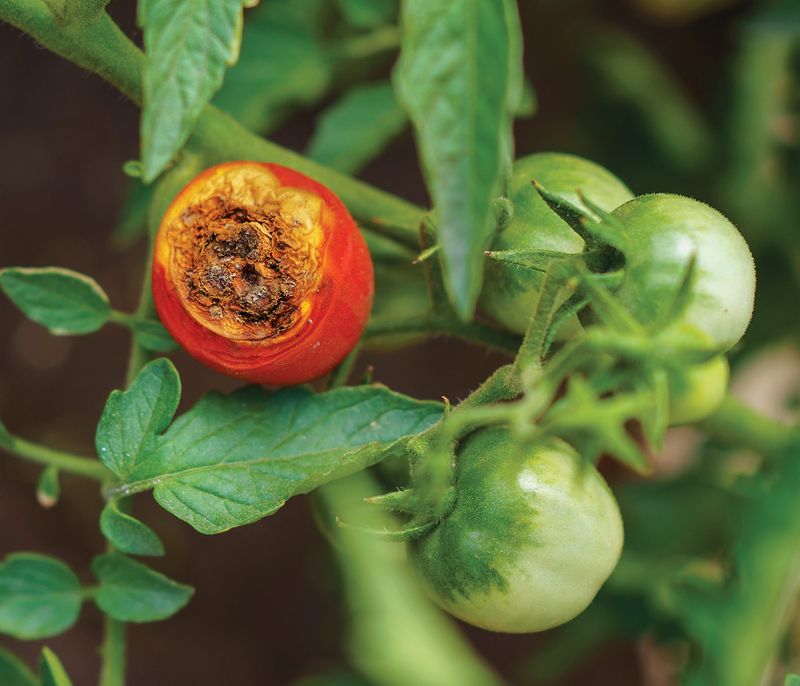
Oregon State University Extension describes the lesion as typically tan, brown, or black, and often flattened, sunken, or leathery to the touch.
The reassuring part is that blossom-end rot is a physiological disorder, not a contagious disease.
Nothing is spreading from plant to plant, no pathogen is moving through your soil, and a fungicide will not help.
Fungi and bacteria can move into the damaged tissue afterward and make it look worse, but they are not the original cause.
The disorder tends to show up on the first fruit of the season, on large slicer varieties, and on elongated types like paste tomatoes.
It usually affects fruit when they are roughly one-third to one-half grown, and University of Minnesota Extension notes that later fruit on the same plant may develop normally once growing conditions stabilize.
So if you are seeing the problem now, there is a real chance the tomatoes that form next will come out fine.
Because the lesion only appears on fruit, not on leaves or stems, that pattern is a useful diagnostic clue.
If you are also seeing spots on leaves or stems, something else is going on and deserves a separate look.
Watering Is A Major Trigger, Not The Whole Cause
Picture the inside of a developing tomato as a construction project running at full speed.
The fruit needs a steady supply of calcium to build strong cell walls, and calcium travels through the plant dissolved in water.
When the soil dries out and then gets flooded, that water flow lurches rather than runs smoothly, and the outermost cells at the blossom end can end up short on calcium even when the soil contains plenty of it.
That is the central mechanism, but it is not the only one.
University of Minnesota Extension lists heat, drought, excessive rain, waterlogged roots, root injury, rapid fruit growth, excess nitrogen, and high soil salinity as additional contributors.
Any of these can disrupt the plant’s ability to move calcium into fruit at the pace the tissue needs it.
Cultivar and fruit size also matter.
Large-fruited slicers and long paste types tend to show the problem more often than small cherry varieties, partly because more tissue needs to be supplied at once and partly because some varieties are simply more sensitive.
The phrase “calcium deficiency” gets used a lot with this disorder, but it needs careful handling.
The fruit tissue may genuinely lack usable calcium, yet the soil could test perfectly adequate.
A peer-reviewed review on blossom-end rot across a century of research notes that no single calcium threshold in fruit tissue reliably predicts which fruit will be affected, and that stress, rapid growth, and calcium distribution within the plant all interact in ways researchers are still sorting out.
So the hose matters, but it is one actor in a larger cast.
Fixing your watering rhythm is the most accessible first step, not the complete cure.
Heat Can Reveal The Disorder
A stretch of 90-degree days does not cause blossom-end rot on its own, but it can act like a magnifying glass over conditions that were already borderline.
Higher temperatures push tomatoes to grow faster and pull more water through the plant.
If the soil moisture is even slightly uneven during that surge, the calcium supply to developing fruit can fall behind in a matter of days.
Oregon State University’s heat-wave garden guidance explains that heat combined with low humidity, high light, and rapid plant growth creates compounding stress.
That combination is why symptoms can seem to appear out of nowhere after a hot spell when nothing obvious changed in your watering routine.
The timing also explains why later fruit on the same plant often escapes the problem.
Once temperatures moderate, rainfall becomes more reliable, or a gardener adjusts the watering schedule, the plant’s calcium transport can stabilize.
Minnesota Extension confirms that later fruit may develop normally after growing conditions improve, which is worth remembering when the first wave of damage feels discouraging.
Container gardeners and those growing in raised beds with fast-draining sandy mix tend to feel this effect the hardest.
Pots sitting on a south-facing patio can lose moisture in a single afternoon.
Heavy clay garden beds in humid regions face a different version of the same stress: roots sitting in saturated soil after a thunderstorm cannot take up calcium any better than roots in bone-dry ground.
The heat is the villain that exposes whichever weak point exists in your specific setup.
Steady Moisture Gives New Fruit A Better Chance
The most useful thing you can do right now is give your tomatoes a more consistent water supply going forward.
That does not mean watering more, it means watering more evenly.
Let the soil dry a little between sessions, but never let it get so dry the plants wilt hard, then get flooded to make up for it.
Utah State University Extension recommends roughly 1 to 2 inches of water per week for tomatoes, applied deeply and consistently as a starting point.
That figure assumes average garden soil and typical summer conditions.
Sandy soil drains faster and may need more frequent watering.
Heavy clay holds water longer and needs less.
Containers, especially small or dark-colored pots in full sun, can dry out completely within 24 hours and need daily checks.
The best way to know whether your soil actually needs water is to push a finger or a trowel blade several inches below the surface.
If the soil at that depth feels dry, it is time to water.
If it still feels moist, wait.
Illinois Extension specifically warns that containers dry quickly and require closer monitoring than in-ground beds.
When you do water, aim at the soil rather than the foliage.
Getting water directly to the root zone is more efficient and reduces the moisture on leaves that can invite disease.
Drip irrigation or a soaker hose laid along the base of the plants handles this well.
Mulch is the partner that makes consistent moisture possible between waterings.
Oregon State University Extension supports mulching the root zone to slow evaporation and reduce the wet-dry swings that trigger the disorder.
A layer of about 2 to 3 inches of straw, shredded leaves, or wood chips works well.
Keep it a few inches away from the stem itself so air can circulate and the bark does not stay constantly damp.
None of this will repair fruit that is already damaged.
But tomatoes forming now, and those that set over the next few weeks, stand a much better chance if the soil moisture stays steady from here on.
Test Soil Before Adding Calcium
When tomatoes show blossom-end rot, the reflex is to add calcium to the garden.
Eggshells, garden lime, gypsum, and foliar sprays all get recommended online, sometimes with real confidence.
Most of the time, they are not the solution, and some can make things worse.
University of Minnesota Extension explains that eggshells break down far too slowly to correct a problem in the current growing season.
The disorder is often driven by water transport rather than a true shortage of calcium in the soil, so adding more calcium to the ground may change nothing about what reaches the fruit.
Lime and gypsum can alter soil pH and chemistry in ways that create new imbalances if the soil did not need them in the first place.
Epsom salts come up constantly as a garden cure-all, but they supply magnesium, not calcium.
Excess magnesium can actually compete with calcium for uptake through the roots, potentially making the calcium supply problem worse rather than better.
The right starting point is a soil test.
Most Cooperative Extension offices and many garden centers offer them at low cost, and the results tell you whether your soil’s calcium level and pH actually need adjustment.
If the numbers look fine, skipping the amendments is the correct call, not a shortcut.
Fertilizer also deserves attention here.
Heavy applications of nitrogen, especially from ammonium-based fertilizers, push rapid leafy growth that can outpace the plant’s calcium delivery system.
Minnesota Extension notes that excess potassium, magnesium, ammonium, or sodium can contribute to nutrient competition or salt stress in the root zone.
Follow the product label and let a soil test guide any additions rather than guessing.
Protect Roots And Remove Damaged Fruit
Roots are the plant’s intake system, and damaged roots mean less water and calcium reaching the fruit.
One of the most common ways gardeners accidentally injure roots is by hoeing or cultivating too close to the stem.
University of Minnesota Extension recommends avoiding root disturbance within about 1 foot of the stem.
If you need to manage weeds in that zone, pull them by hand rather than using a hoe.
Compacted soil, waterlogged ground after heavy rain, and physical damage from transplanting can also reduce root function.
Raised beds and well-amended garden soil help roots spread freely and drain properly.
If your beds tend to stay wet for more than a day or two after rain, improving drainage may do as much good as any watering adjustment.
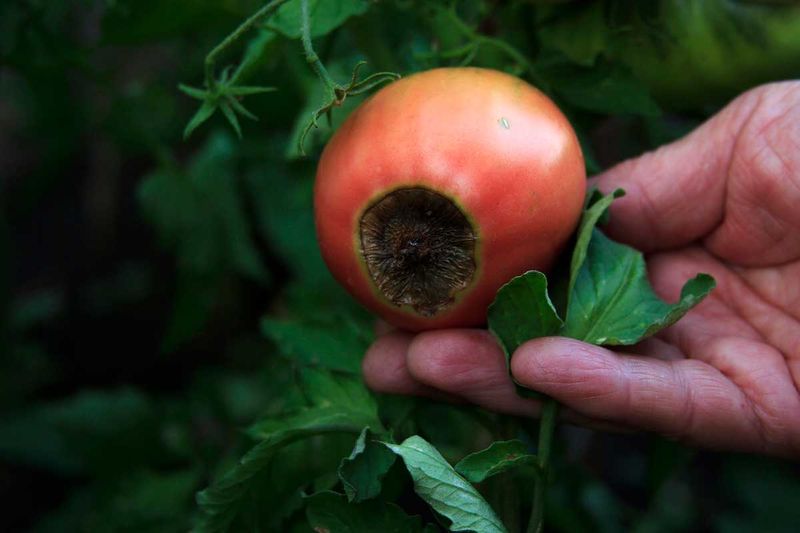
As for the fruit already showing the dark, sunken patch, those tomatoes will not recover.
Oregon State University Extension and other sources agree that removing badly affected fruit is a reasonable step.
It prevents the plant from spending energy on fruit that will not be usable, and it may help the plant put more resources toward the tomatoes forming now.
Some gardeners wonder whether a calcium chloride foliar spray might rescue developing fruit.
Illinois Extension notes that foliar calcium generally does not help much because calcium moves poorly from leaf surfaces into the fruit.
Correcting soil moisture and protecting roots are the more reliable actions.
A spray is not a dependable substitute for fixing the underlying growing conditions.
Compare The Lesion Before You Blame Water
Not every black or sunken spot on a tomato comes from blossom-end rot, and treating the wrong problem wastes time and money.
Location is the first thing to check.
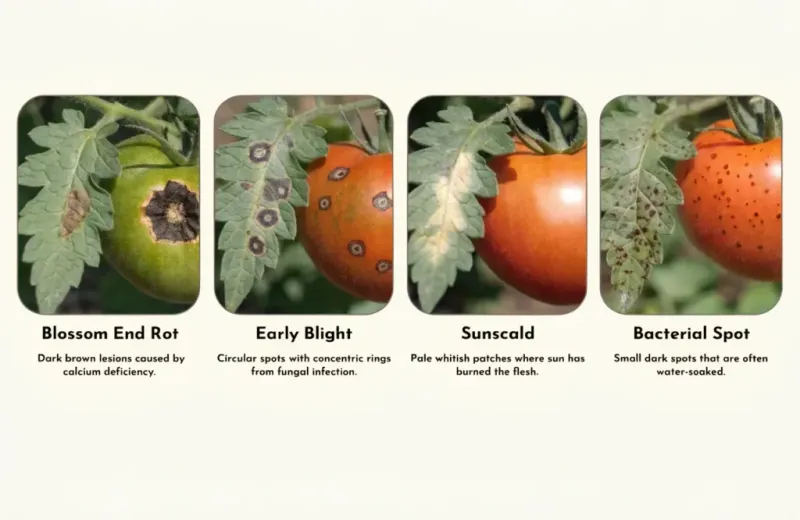
Blossom-end rot begins at the blossom end, the bottom of the fruit opposite the stem.
If the damage is near the stem end or wrapped around the shoulder of the fruit, you are probably looking at something else.
University of Minnesota’s tomato fruit-spot diagnostic tool describes anthracnose as typically producing round, sunken spots on ripe or overripe fruit, sometimes with dark centers or pinkish spore masses.
Anthracnose is a fungal disease that spreads and responds to different management than blossom-end rot does.
Early blight can produce fruit lesions too, but they tend to appear near the stem end and often show the concentric rings that give the disease its name.
You may also see early blight spots on older leaves lower on the plant, which blossom-end rot will not cause.
Sunscald is another look-alike.
It tends to affect fruit that lost leaf cover through heavy pruning or disease, leaving fruit exposed to intense direct sun.
The damaged area usually sits on an exposed shoulder or side of the fruit rather than specifically at the blossom end, and it often looks pale, papery, or bleached before it darkens.
Oregon State University Extension notes that secondary fungi can colonize blossom-end rot tissue, making the lesion look more like a disease problem than it actually is.
Checking the location, texture, fruit maturity, and whether leaves are also affected gives you a much clearer picture before you reach for any treatment.
Judge The Harvest Conservatively
Once you have stabilized the moisture, added mulch, and stopped cultivating close to the roots, shift your attention to the fruit forming right now.
Those tomatoes are the ones that will benefit from the changes you just made.
Early fruit that already showed the disorder may continue to fail for a few more days even as conditions improve, so do not judge the fix too quickly.
University of Minnesota Extension confirms that later fruit on the same plant often develops normally once growing conditions stabilize.
That is the realistic promise here: not that every tomato will be saved, but that the next wave has a genuinely better chance.
For the damaged fruit already in hand, use conservative judgment.
Colorado State University Extension guidance suggests the unaffected portion of a mildly damaged tomato may still be usable when the lesion is small and the rest of the fruit is firm and fresh.
Cut well past the dark tissue and check that what remains smells clean and feels solid.
Discard any tomato with extensive rot, mold, a foul odor, soft or mushy flesh beyond the lesion, or any sign of secondary fungal or bacterial infection spreading through the fruit.
Secondary organisms can move into blossom-end rot tissue quickly, especially in warm weather, and the result is not safe to eat regardless of how much of the tomato looks fine from the outside.
A garden that produces one difficult batch of tomatoes and then rights itself is not a failing garden.
Blossom-end rot is a stress response, and stress responses ease when the conditions that caused them change.
The tomato that sits rotting in your hand is not a warning about next year, it is a data point pointing toward steadier water, better root care, and a soil test before you add anything else to the ground.